Analog flying part 1.

Thanks to my new camera and some surfing around on the net, I can get around to doing this post on flying the Lear and the differences in flying between what I do and what someone flying a glass cockpit does. Its going to be a multi part post starting off with a description of my cockpit and how I use certain things. It will progress into how I fly the plane and how it is different from what someone in a nicely equipped aircraft might do.
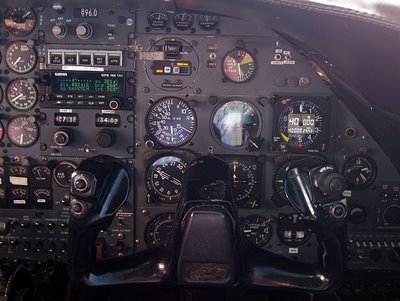
This first picture is of my exact view of the instrument panel as I see it. I put the camera as close to the exact point my eyes would be to take the picture. I'll start off in the top left and describe what things are and how I use them. At the top left is a vertical row of 4 round dials. The top one is my EPR or engine pressure ratio. This is one way we determine how much power/thrust the engine is producing. We us this primarily on take off to set "take off" power. Below that is the Exhaust temp gauge. This is also used to set power. We use this to set climb power and sometimes cruise power. Below that is our N1 gauge. Yet another way we can set power settings. This lets us know how fast the engine is rotating. We will use this as our primary way of setting power on approaches. The bottom dial is our oil pressure gauge. Not used for much besides checking pressures on the take off roll. Directly below the column of dials is a six pack of little gauges that house all of the electrical gauges. Continuing down there are two rows of switches. Those control the outside light, inverters, stall warnings, igniters, bleed air and anti skid. [The problem with this set up is that there is no constancy between aircraft in where these switches are located. They are in all different positions depending on what plane you are flying. I have to spend a minute or two searching the cockpit for switches and instruments every time I get in another plane.] The throttle quadrant is at the very bottom left of the picture and you don't see much of it. Moving back to the top of the picture, directly to the right of the dials you'll see the numbers 896.0 Thats the ADF, a.k.a the trip number holder. Its supposed to be used for navigation, but that mode of navigation is pretty out-dated and hardly used any more. Again, its one of those things that's never in the same place in any of our planes.
Below that you will see 5 little squares with the letters AP CPLD, ALT, HDG, NAV LOC and APPR. These 5 buttons control the flight director. At my company we almost never use them either in the Falcon or the Lear. 99% of our flying is raw data. Meaning we use information directly from our 6 pack. [Airspeed, Attitude Indicator (A.I), Altimeter, VSI (vertical speed), HSI, and RMI. The flight director is a great little tool that displays information directly on the AI. You can use it to fly the airplane. If your hand flying, all you do is keep it lined up and you'll fly a perfect approach, make a perfect turn, fly straight and level, climb or descend at a specific pitch attitude, ect. It can be used in almost every phase of flight. I'd say pilots with glass cockpits will use a flight director 95% or the time. Coupled with the auto pilot, it'll fly the plane for you. It makes flying so much easier. At my company, not a single one of our Lears has a flight director on my side. 100% of my flying in a Lear is raw data.
Back to the cockpit. Below the 5 flight director buttons is the GPS. We use just basic units that are extremely old and out dated. Those Tom Tom's you see on TV are way more advanced than what we have. Again, these are never in the same place. Below the GPS is Comm 1 and below that covered by the yoke are the flap position indicator and the engine start/gen switches, battery master switches and gear handle. Back to the top of the picture you will see 3 little round dials. Those are the oxygen and hydraulic pressure gauges. Below that is the TAWS or terrain awareness warning system and next to that is the angle of attack indicator. Directly below that is my standard 6 pack.
These 6 instruments are how I fly the plane. Working clockwise from the top left of the pack your see my very basic airspeed indicator. Those little triangles in there are how I set my V speeds. On the right is my attitude indicator. As you can see very very basic. The Falcons all have the good A.I's. Lears all suck. Next to that is the RVSM altimeter, very cool. Directly below that covered by the yoke is the VSI. Now we get to my little problem in the Lear. As I said in an earlier post, I have trouble getting a good look at the HSI from a normal sitting position. Now you can see exactly what I do. As you can see, most of it is covered by the yoke. This creates a problem when attempting to fly an approach because I have to sit straight up and cram my head to the right in order to see around the yoke. Not fun when flying in turbulence because my head smacks against the window. The glideslope is covered the most, so that is the most difficult part of the HSI to see.
I'm tired, time to go to bed. Part 2 will cover approaches and that'll come at a later date.


1 Comments:
Very interesting, thank you.
Post a Comment
<< Home